9th May – Board 14: Love All. Dealer East.
How would you feel if the
opponents bid freely to 3NT and you – not on lead – held something like: S xx H
xxx D AKQJxx C xx? Partner of course won’t lead a diamond unless you do
something about it and the standard way is to double, essentially asking
partner to find an unusual lead, which is often his shortest suit. Using that
sophistication would have led to a certain amount of frustration on the
following hand:
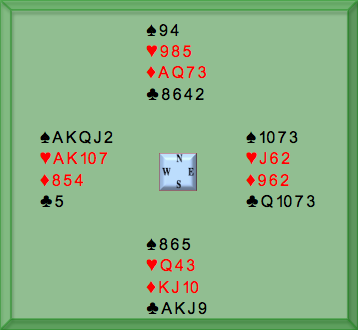
North:
S A K Q J 7
H A 9 5
D 9 8 4 3
C 7
|
||
West:
S 6 2
H Q 4
D K Q 10 7 5
C A J 9 5
|
East:
S 10 9
H K J 3
D A J 2
C K Q 8 6 3
|
|
South:
S 8 5 4 3
H 10 8 7 5
2
D 6
C 10 4 2
|
West
|
North
|
East
|
South
|
No
|
No
|
1NT
|
No
|
3NT
|
Dbl
|
End
|
North
would probably double the final contract hoping that partner was short in
spades and could find a spade (or heart) lead, but the awful irony is that
South would probably be deflected from doing the right thing and lead a diamond
whereupon a delighted declarer would rattle off the first ten tricks.