Signaling can take one of
several forms but maybe the most important of all is the count signal whereby
you tell partner the parity you have in a certain holding, that is to say
whether you have an even or an odd number of cards in a suit. Traditionally,
playing high-low shows an even number and vice-versa (although some players do
play reverse count.)
A selection of hands from our No Fear Thursday club which I think are interesting. Please add your comments at the end of any post. If you wish to join us please contact david.huggett1@btinternet.com or phone 07867617242.
Showing posts with label count. Show all posts
Giving Count
2nd August – Board 17: Love All.
Dealer North.
The auction may take different turns but to my mind the one given above is not unreasonable. The 4♣ bid by East is a splinter in agreement of diamonds and South would be extremely wet if he didn’t join in at that stage. 5♣ can be defeated but probably won’t be as East is likely to kick off with the ace of diamonds leaving declarer an easy task of drawing trumps and setting up the heart suit and making all thirteen tricks! Against 5♦ North should lead the club king which specifically asks for a count signal and South must be careful to play a high card to indicate an even number of cards in the suit. Without that knowledge North might try to cash the ace, but declarer would ruff and set up the spades via a ruff for an unlikely overtrick. With the knowledge that his partner has an even number of clubs North should switch to the king of hearts at trick two with South playing the ten. As South could hardly have four card heart support North knows he can cash a second heart for sure. Just remember that when you have the ace and king in a suit you can lead either, so why not have leading the Ace to ask for Attitude and the King to ask for Kount.
Going For Broke
12th July – Board 7: North/South Vul. Dealer
South.
Unless playing a strong variety South is bound to open 1NT and West should not look anywhere else than trying for a penalty. East may not like it but with nowhere else to go he should hope that partner has enough tricks in his own hand to defeat this contract, but in fact it is East who holds the two cards that might exact a penalty of 800 points. Suppose that West kicks off with the king of spades rather than the ace. This asks East to give count, and the three would be the start of an odd number, three in this case. So after cashing two top spades West just might consider cashing the king of hearts before leading a low spade! Imagine that! A bemused East would win with the ten and return the jack of hearts and now the defence can come to the first nine tricks. Would I have done that? I doubt it, but it would certainly make for a good dining out story.
I found this hand the most
exciting because it gave West the opportunity to appear truly heroic – or truly
suicidal!
Unnecessary Risk
5th January – Board 19: East/West Vul. Dealer South.
East took the right view in the bidding but the wrong view in the play leading to a catastrophic result, but as so often happens when under pressure all reasoning goes out the window.
West
|
North
|
East
|
South
|
No
| |||
No
|
4H
|
Dbl
|
End
|
Ace for Attitude, King for Count
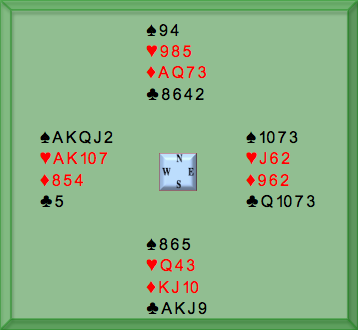
1st September – Board 11: Love All. Dealer South.
Guest Blogger: Jill
I love to read David’s blogs, but I sometimes think they’re a bit too difficult for we mere mortals. And will I remember what he’s said (eg in Fire with Fire below) when the same situation comes up in three years’ time?! Here’s something that’s dead easy to remember and comes up quite often.
You might or might not agree with the bidding, but South is declarer in 3S. West leads out the A and K of clubs and everyone follows. What next? Who has the remaining club? If it’s declarer, West can lead another club knowing that partner can ruff (or over-ruff) North. But if partner has the last club, that will give declarer a ruff and discard. You need to know how many clubs partner had to start with. You won’t often lead the Ace or King without having both, so you can lead the Ace when you want to know partner’s Attitude to the suit, and the King when you want to know Count – the number of cards he has in the suit. So in this case, West leads the King first. As partner has an even number of cards, he plays a high one followed by a low one (with an odd number, he plays his lowest card first). In another situation, if you want to know attitude, you lead the Ace. If partner likes it (eg if he has the Queen), he plays a high card. If not, he plays a low one and you can switch to another suit.
Guest Blogger: Jill
I love to read David’s blogs, but I sometimes think they’re a bit too difficult for we mere mortals. And will I remember what he’s said (eg in Fire with Fire below) when the same situation comes up in three years’ time?! Here’s something that’s dead easy to remember and comes up quite often.
South
|
West
|
North
|
East
|
1S
|
2C
|
3S
|
No
|
End
|
The Hardest Part
4th August – Board 8: Love All. Dealer West.
Bridge is not an easy game and the hardest part by far is defence. I think everyone was in 3NT on the featured hand and all bar one made it - some with an overtrick – when in reality declarer should have been hard pressed.
West
|
North
|
East
|
South
|
1NT
|
No
|
3NT
|
End
|
East might have started with Stayman but with such a balanced hand I think that is unnecessary. When you have a holding such as North did in clubs then you have a choice between leading the ace or the king and they should ask partner to tell different things about his holding in the suit. So the Ace should ask for Attitude while the King should ask for Kount. (Ok, I know.) Here North would lead the ace and South should discourage by playing the two, an unequivocal statement that he does not hold the queen – or if he does it is now singleton and the suit is blocked. So North must switch and knowing that his partner holds 1, 2 or 3 points only he has to find the safest suit to switch to and that is hearts. Declarer will win perforce and cash three more tricks in the suit and North must not shed a diamond else declarer has four winners there, and his best bet is a low club. If declarer now cashes the ace of spades North must be careful to throw his king under it to avoid being end-played in diamonds to lead away ultimately from his remaining club holding. See what I mean about it being difficult?
Double Trouble
5th August – Board 7: Game All. Dealer South.
North:
S K 10 7 3
H 9 8 6
D Q 9 6 2
C 9 7
| ||
West:
S A J 6
H Q 7
D A K 10
C K J 8 4 2
|
East:
S 9 8 2
H A J 4 3 2
D 8 7 3
C 10 6
| |
South:
S Q 5 4
H K 10 5
D J 5 4
C A Q 5 3
|
West
|
North
|
East
|
South
|
1NT
| |||
Dbl
|
All Pass
|
Subscribe to:
Posts (Atom)